Contents
- 1. What this manual covers
- 2. Installation, activation and first startup
- 3. Company, management centre and first administrator
- 4. Staff accounts, roles and declared credentials
- 5. People and examinee information
- 6. Examinee information: what to enter
- 7. Cases, participants, facts and attachments
- 8. Issues and the logic of a testable question
- 9. Question sets and person-specific wording
- 10. Shared plans and the preparation workspace
- 11. Pretest, comprehension, suitability and consent
- 12. Guided automation and examiner confirmations
- 13. Examination records and frozen identity
- 14. Sensor connection, USB and binary-file input
- 15. Preparation handoff, recording, stop and exit
- 16. Recording-screen controls and display
- 17. Camera, monitor and optional room audio
- 18. Review Session, replay and exports
- 19. Machine analytics, reviewed analytics and provenance
- 20. Reading channels and question-response windows
- 21. Examiner findings and immutable history
- 22. Versioned reports, signal graphs, PDF and printing
- 23. Worklists, central Reports and oversight
- 24. Administration, rules and health
- 25. Backup, isolated restoration and data protection
- 26. External AI assistance and safe data exchange
- 27. End-to-end practice exercise
- 28. Fault isolation without destroying evidence
- 29. Limits, acceptance and complete-work checklist
- 30. Daily operating checklist
1. What this manual covers
Use this guide for the recording screen, Office management, case preparation, review and reports. Start with setup, then follow one examination from the person's record to the final saved report. Read the cautions before using an optional feature. An available button does not mean every prerequisite has been met.
Use the package and functions supplied for your approved scope. The interface languages are English, Hebrew, Arabic, Russian, French and Spanish. Changing the interface language does not translate saved questions, case narratives or existing reports. Check the actual question language separately and save work before a requested restart.
A recorded physiological response, camera observation or software heuristic is not proof of truth or deception. The human examiner selects an appropriate method, checks suitability and evidence, documents limitations and owns any professional opinion. This manual is software instruction, not examiner training.
2. Installation, activation and first startup
1) Keep the complete approved package together; do not copy only the EXE. 2) Confirm Windows and device compatibility for the delivered version. 3) Launch Start-Polygraph.cmd in that package. Preparation-preview launchers are not the full operational startup.
Allow legitimate registration/licensing and database checks to finish. Never erase registration, change a device serial or delete a customer database to bypass a refusal. If startup fails, preserve the error, package version and relevant logs; contact support without sending passwords or examinee records.
The language selector changes the interface. A language change requests normal closure and restart; pending work can prevent it. Save or explicitly resolve drafts first. A restart is not permission to resume an interrupted examination automatically. A new workstation still needs its own verified installation acceptance.
3. Company, management centre and first administrator
Open Office from the recording application. If prompted to create the first administrator, enter the required information, save and sign in with that account. Otherwise use your existing named account. If no authorized account is available, contact your administrator or support; do not create a replacement office to bypass access.
In Management center → Company & Administrator, enter the office identity, contact/address details, time zone and reference. Choose an existing eligible administrator as manager. Save a company revision, reload and verify the values. Company preferences do not themselves restart an open interface.
Use Management center to open Company, Users, People, Cases, Exams, Review, Reports, Settings and Backup/Health. Opening a section does not save or approve anything. Finish each form with its save action and reopen it to check. A company administrator is not automatically the examiner assigned to a particular examination.
Operating steps
- Open Office, authenticate as the authorized administrator and open Management center → Company & Administrator.
- Enter company/contact/time-zone details. Select an existing eligible administrator as manager; a typed examiner name is not an account.
- Save the company revision, leave and reopen the page. Verify the persisted values rather than only the save notification.
- Use the management links to open the intended existing page. Opening a page does not create people, approve questions or start recording.
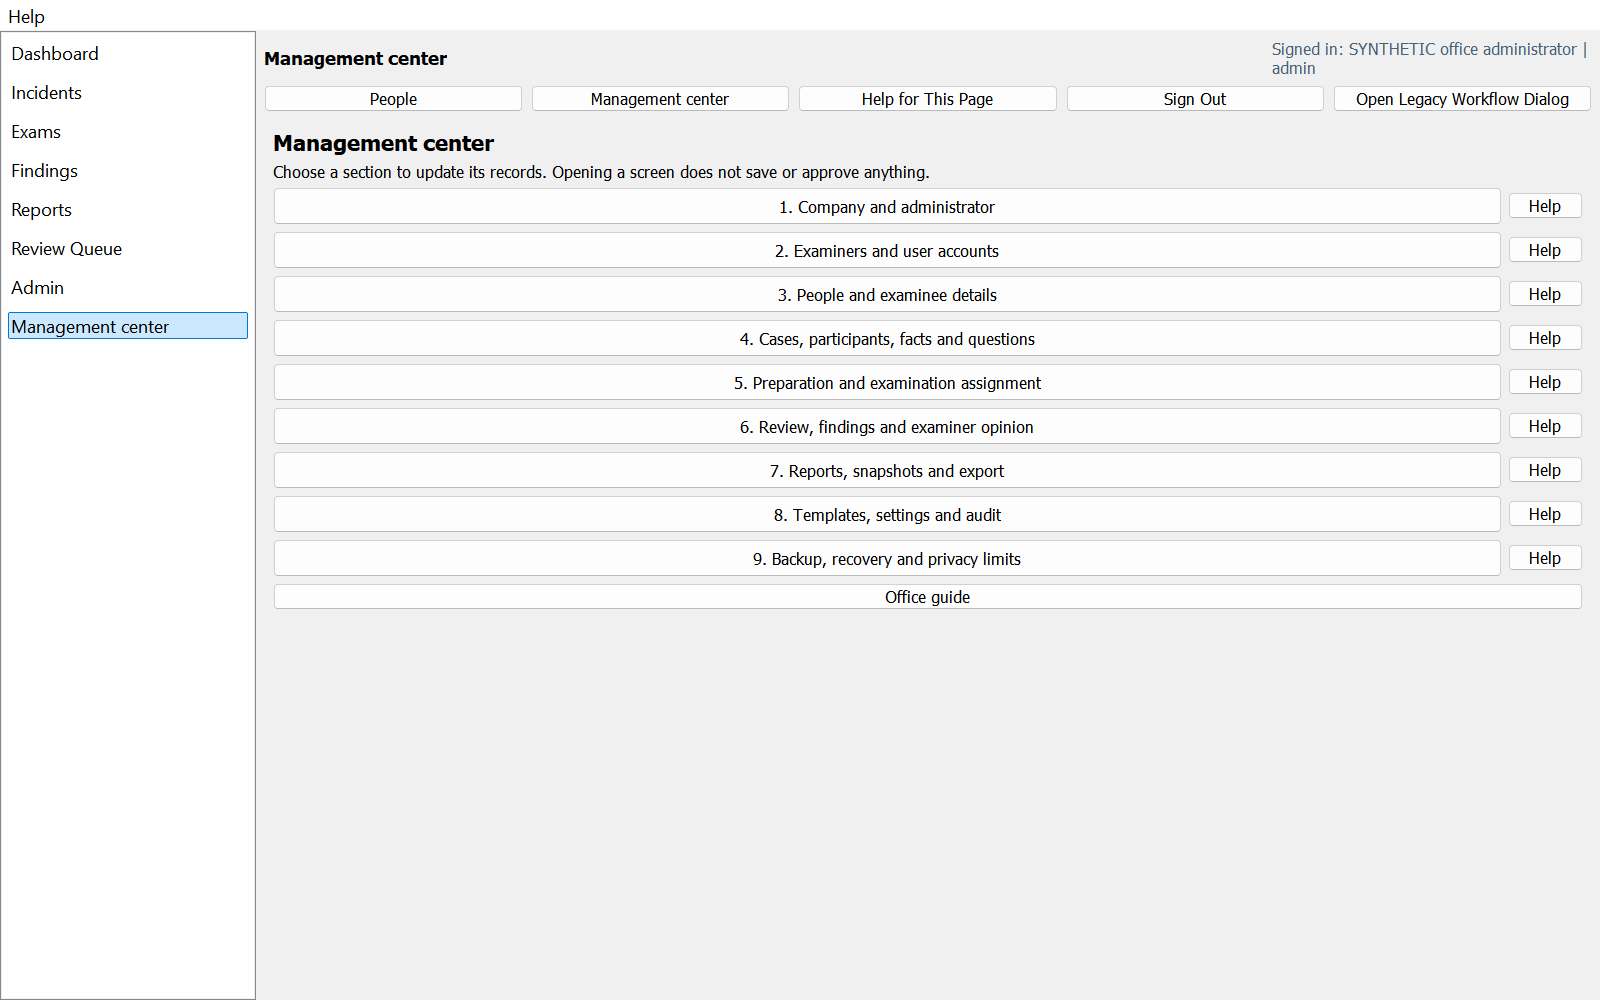
Illustrations use fictional demonstration data. Visible warnings are part of the example, not instructions to bypass prerequisites. Open a picture for its original resolution. Some on-screen explanations remain English; follow the translated operating instructions.
4. Staff accounts, roles and declared credentials
Use Workflow Users / Roles to create named staff accounts, set passwords, assign the necessary examiner/reviewer/supervisor/admin roles and set active status. Sign out and verify the intended account before attributed work. Do not share an administrator password as an office operating procedure.
Examiner / System Settings → Examiner professional profiles stores declared professional name, organization, training, credential claims and sources, scope, languages, experience, contacts and optional validity date. Administrators edit eligible examiners; examiners edit themselves. Claims and source references are not independently verified licenses.
Checked operations revalidate the current account and roles; password reset or deactivation can revoke a session. Protected viewers clear or refuse actions, but this is not complete per-case or enterprise access control. Preserve historical attribution rather than renaming a previous examiner into a different person.
Operating steps
- Open Workflow Users / Roles and choose New for a new member of staff, or select the intended existing account.
- Enter the account details and only required roles; save, reload and check active status. Do not reuse another person's historical identity.
- Open Examiner professional profiles separately, explicitly select an eligible examiner and record declared background and credential sources.
- Save/reopen the profile revision. Credentials remain declarations; a saved profile does not grant a role or establish professional approval.
5. People and examinee information
Open People and choose New person. Enter the identity and preferred name, birth information, self-described gender, language, comprehension, interpreter or accessibility needs, contact and residence, occupation, education and relevant background. Use the field guide below. Collect only information that has a legitimate purpose for the examination; record current suitability separately.
For each fact choose reported, disputed, unknown, declined, not asked or not applicable; record its value, source and collection purpose where required. A reported preferred name is required. Unknown is not zero or false; a source statement is not independent verification. Never invent data to satisfy validation.
Save and reopen the profile. People with the same name are not necessarily the same person. A later edit does not rewrite information already used for an earlier examination. Check the selected person's details before linking to a case. Moving protected records to another computer or Windows account requires a separately verified recovery procedure.
Operating steps
- Open People, choose New person or select the correct existing person. Verify identity before editing or linking.
- For each relevant fact set status first, then value/source/purpose as required. Scroll vertically for all 17 fields and horizontally for source/purpose columns.
- Save person revision and reopen it. Preserve unknown/declined/not-asked states; do not fill them with invented values.
- To link: save the case participant first, choose the intended case and participant, inspect identity and confirm explicitly. Cancel does not link; an existing pin is not replaced by a later master revision.
6. Examinee information: what to enter
Names: distinguish preferred and legal name. Birth: record the known date or year and its precision; do not invent a day when only the year is known. Gender and pronouns are self-described, not inferred from appearance. Record what was actually provided and its source.
Communication: enter preferred language, other languages, comprehension needs, interpreter needs and accessibility needs separately. Knowing a language is not proof of understanding the exact question. Confirm comprehension during pretest. Record phone, email and residence only for an authorized operational purpose; an accepted email format does not verify the mailbox.
Background: enter occupation, education and relevant background only when needed for understandable instructions or legitimate examination context. Do not use lifestyle, ethnicity, religion, gender or personality as a shortcut to a deception judgment. Keep current suitability, consent and case allegations in their appropriate examination or case sections, not mixed into personal identity.
For each item, distinguish reported, disputed, unknown, declined, not asked and not applicable. For reported or disputed information, supply the value, source and reason for collecting it. Leave an unknown value genuinely unknown. Use vertical and horizontal scrolling to inspect the entire form, then Save, close and reopen to verify your entry.
7. Cases, participants, facts and attachments
Incidents/Cases → New Case: enter a case number, title, type and allegation summary; save before adding dependent records. In Linked Persons add case participants, their case-specific roles and the intended examinee candidate. One case can contain many people and examinations.
For a saved participant, explicitly choose a saved People record and confirm the identity link. The link pins that person's selected revision; name matching is not automatic. Verify the target case and participant. Ordinary mislink correction is not implemented; do not delete/relink records to manufacture a correction.
Facts records keep relevant allegations, known/disputed information and provenance separate. Attachments currently provide metadata-oriented references; do not assume external files were copied or backed up. Put only necessary personal information in the case and check external-file availability separately.
Work through the full narrative, event dates, reported date, location, city and country where relevant. Keep the alleged act separate from what is known and what is disputed. Add separate sourced facts rather than burying all information in one narrative. Identify each participant's role without treating a suspicion as a proven fact. Reopen the saved case before planning questions.
Operating steps
- Create/save the case header and allegation summary. Keep allegations separate from established or disputed facts.
- Add each case participant and the correct role/candidate flag. Use the separate People link for durable identity; participant names alone do not establish it.
- Add individual sourced facts; define focused issues with act, object, time and location. Mark the intended primary issue and save/reload.
- Add attachment references only when authorized. Verify external files separately; the Audit tab helps inspect recorded changes, not guarantee every external action is logged.
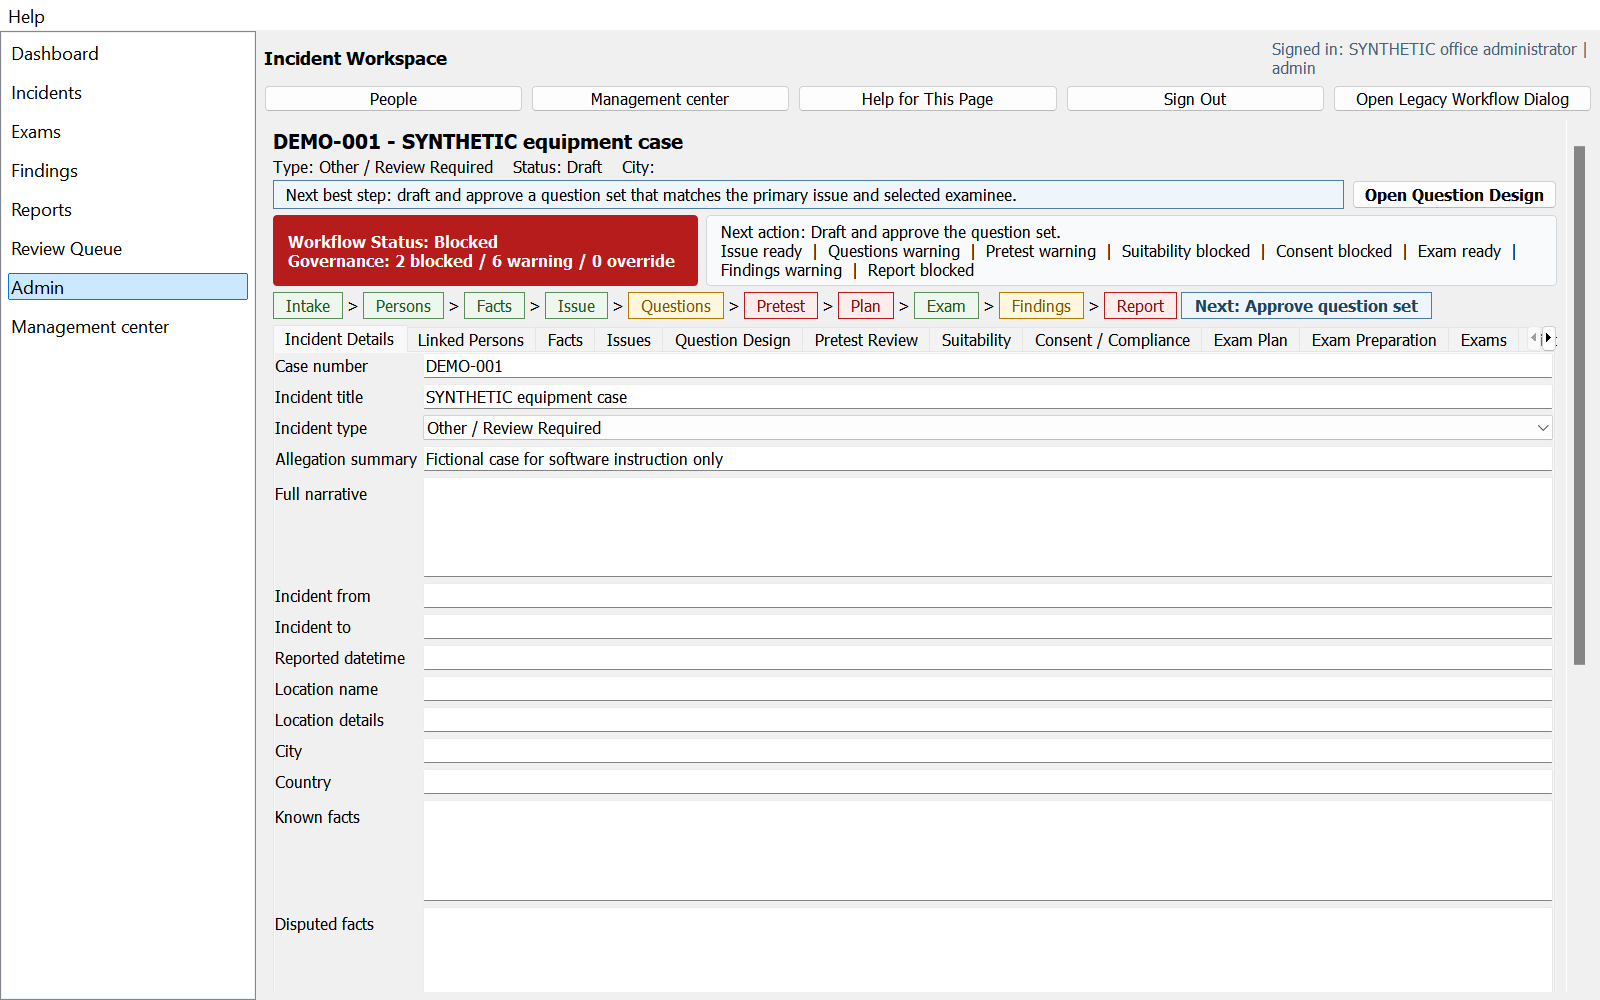
Illustrations use fictional demonstration data. Visible warnings are part of the example, not instructions to bypass prerequisites. Open a picture for its original resolution. Some on-screen explanations remain English; follow the translated operating instructions.
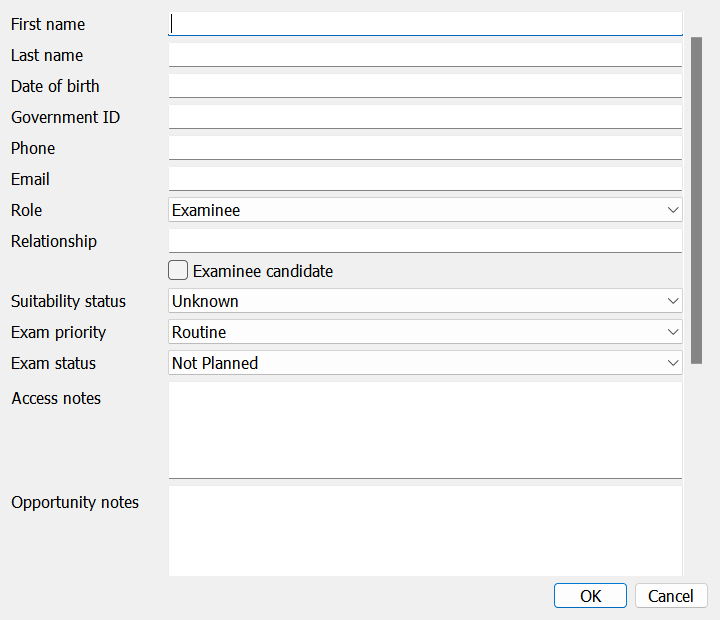
Illustrations use fictional demonstration data. Visible warnings are part of the example, not instructions to bypass prerequisites. Open a picture for its original resolution. Some on-screen explanations remain English; follow the translated operating instructions.
8. Issues and the logic of a testable question
In Issues create a focused issue manually or with Create from Template, then identify the primary issue. Specify the act, object, relevant time and location where required. Separate distinct issues instead of writing one broad allegation that combines several actions.
The software checks configured anchors, wording and template requirements. Missing structure can block or warn at later stages. A green readiness indicator means the implemented checks passed; it does not establish that an allegation is true or that a method is professionally validated.
Where shared case-question planning is available, reuse the case logic while reviewing each person's actual wording and relevant circumstances. Missing personal details must remain unresolved until supplied. Editing a shared draft must not be assumed to change an already approved question set; reopen and check the set that will actually be used.
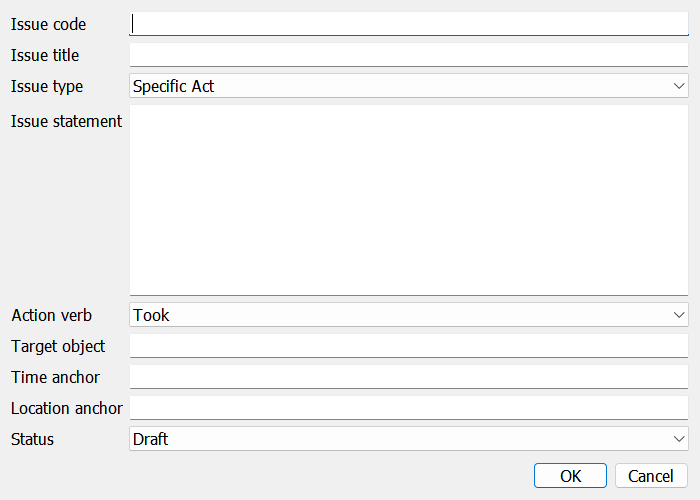
Illustrations use fictional demonstration data. Visible warnings are part of the example, not instructions to bypass prerequisites. Open a picture for its original resolution. Some on-screen explanations remain English; follow the translated operating instructions.
9. Question sets and person-specific wording
In Question Design select the actual case, examinee and issue, create a question set, choose its language and generate or enter drafts. Review each exact sentence, question type, order, time/location anchors and expected response declarations where required. Save and reopen the set.
Rules can flag prohibited wording, required anchors, excessive length or style problems. Resolve the actual cause; an override, where allowed, needs an honest reason. Draft generation, a template or AI suggestion does not approve a question. Never substitute a personal detail without checking the intended person.
The selected set is the version to review before the examination. In shared-plan preparation, inspect Review Changes and missing-information guidance before generating individual drafts. Previously frozen or manually authored examinations are not silently converted. Interface translation never changes recorded question wording.
Operating steps
- In Question Design select the saved issue and examinee, then create/name the set and choose its actual question language.
- Generate a draft or enter questions. Review each exact wording, type, sequence and anchors; sample template output is not approval.
- Resolve wording warnings or record an authorized, reasoned exception where supported. Save the set and reopen it before marking its reviewed/approved state.
- Continue to Pretest Review with the same set/version. If wording changes, reassess comprehension/review; interface language changes never translate stored questions.
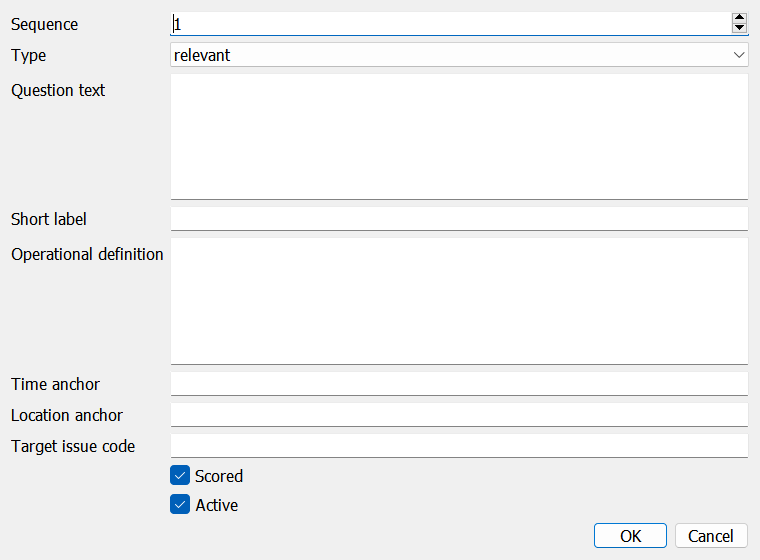
Illustrations use fictional demonstration data. Visible warnings are part of the example, not instructions to bypass prerequisites. Open a picture for its original resolution. Some on-screen explanations remain English; follow the translated operating instructions.
10. Shared plans and the preparation workspace
When your package includes a preparation workspace, choose the intended case and person there explicitly. A shared case plan organizes common topics; person-specific details produce drafts that still need review. Separate case assertions from confirmed facts and record their sources. An unresolved placeholder must not become an invented name, action, date or admission.
Review coverage of each intended issue, the generated wording, comprehension and the preparation checklist. Use rehearsal for practice, not as a completed actual examination. Keep synthetic demonstrations and file playback clearly labelled. A preparation record does not by itself mean a live recording, media file or professional opinion exists.
Do not assume that records open in preparation automatically appear in Office or the recording screen. Use only the supplied explicit transfer action and verify its destination and result. If it reports a missing prerequisite, resolve that prerequisite and recheck. Do not copy material manually merely to make a blocked examination appear ready.
11. Pretest, comprehension, suitability and consent
Pretest Review: inspect each question with the examinee, document comprehension/clarifications and final wording, then save and complete/lock the review when appropriate. An unlock requires the permitted role and reason. A wording change may require renewed review; do not rely on an old approval of different text.
Suitability records examination-specific factors and the operator's assessment. Record uncertainty or postponement honestly. The software does not supply a medical diagnosis or prove suitability from a waveform. Do not continue solely because a form can be saved.
Consent / Compliance stores consent/refusal and relevant policy/jurisdiction warnings. Review the applicable professional/legal requirements independently. A software setting, administrator override or AI response is not consent or legal permission, particularly for employment use. Record a refusal without converting it into acceptance.
Operating steps
- Select the actual person/set in Pretest Review. Review each question with the person and document comprehension, clarifications and final wording.
- Save and complete/lock the review only after the real procedure. Unlocking needs the allowed role/reason and may invalidate previous readiness.
- Record examination-specific suitability, including uncertainty/postponement. In Consent / Compliance record the actual consent or refusal and inspect applicable warnings.
- Return to the plan/readiness view. A warning acknowledgement is not a completed prerequisite; do not override missing facts or consent merely to turn a banner green.
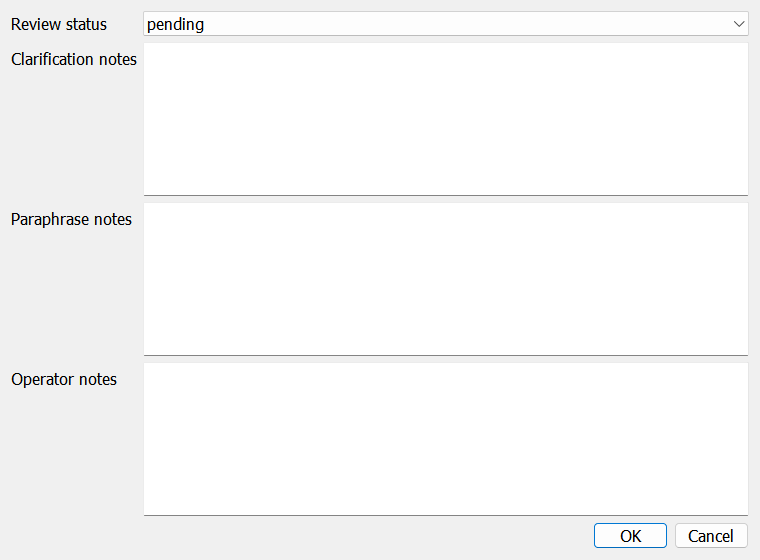
Illustrations use fictional demonstration data. Visible warnings are part of the example, not instructions to bypass prerequisites. Open a picture for its original resolution. Some on-screen explanations remain English; follow the translated operating instructions.
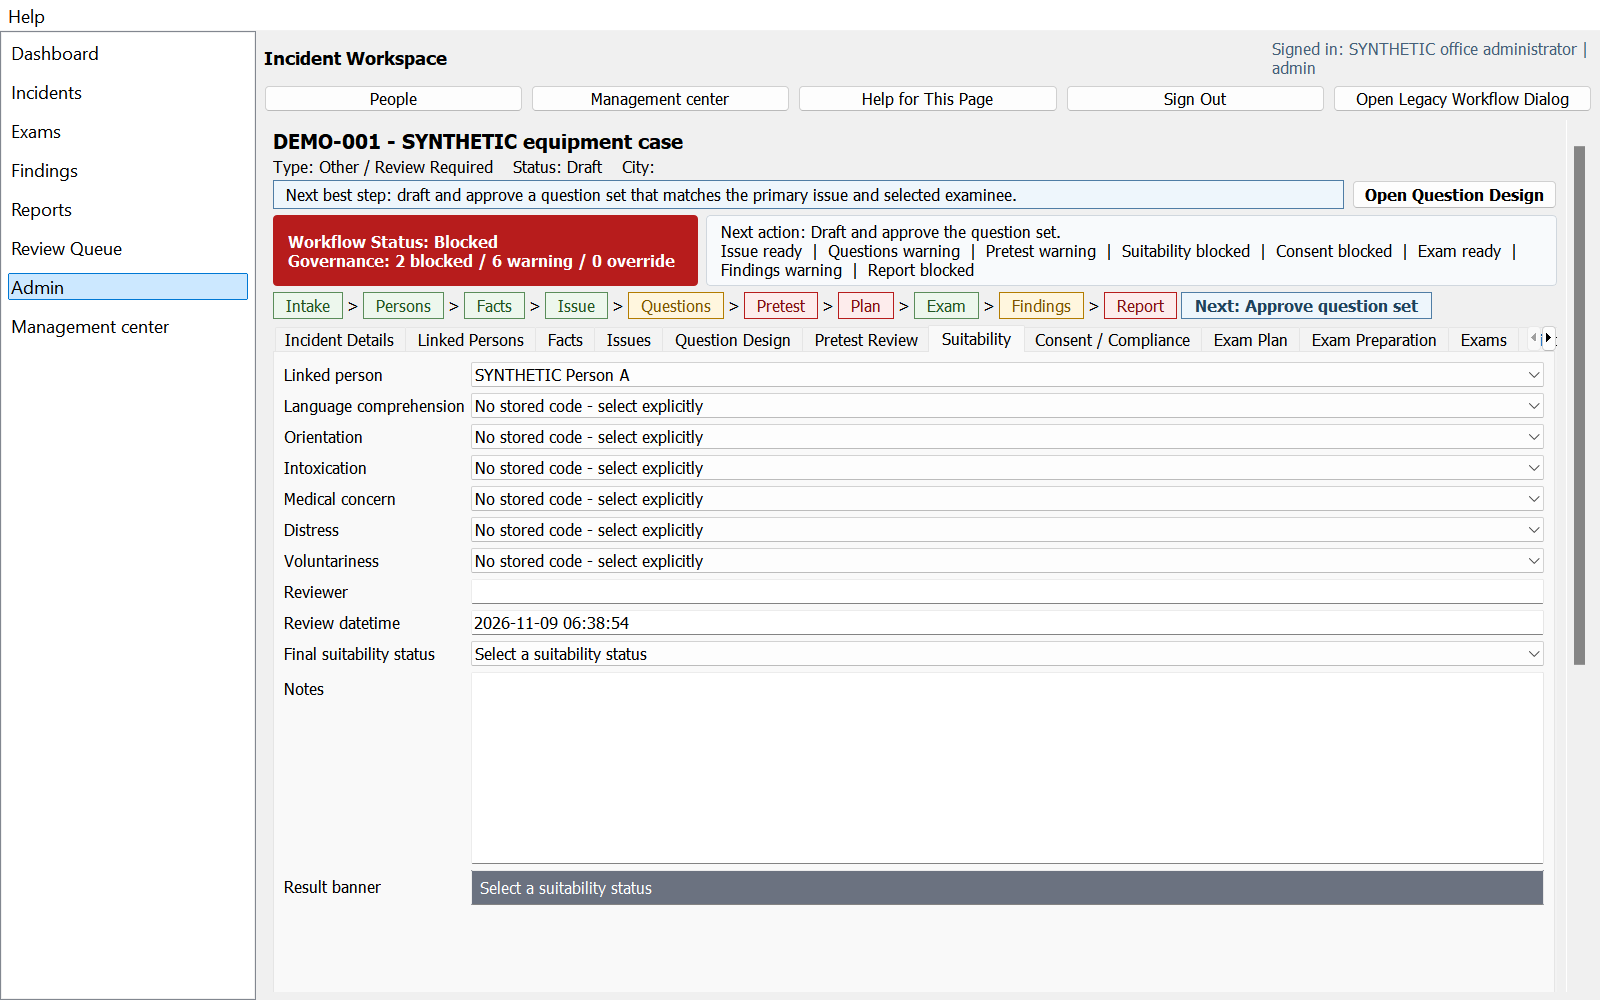
Illustrations use fictional demonstration data. Visible warnings are part of the example, not instructions to bypass prerequisites. Open a picture for its original resolution. Some on-screen explanations remain English; follow the translated operating instructions.
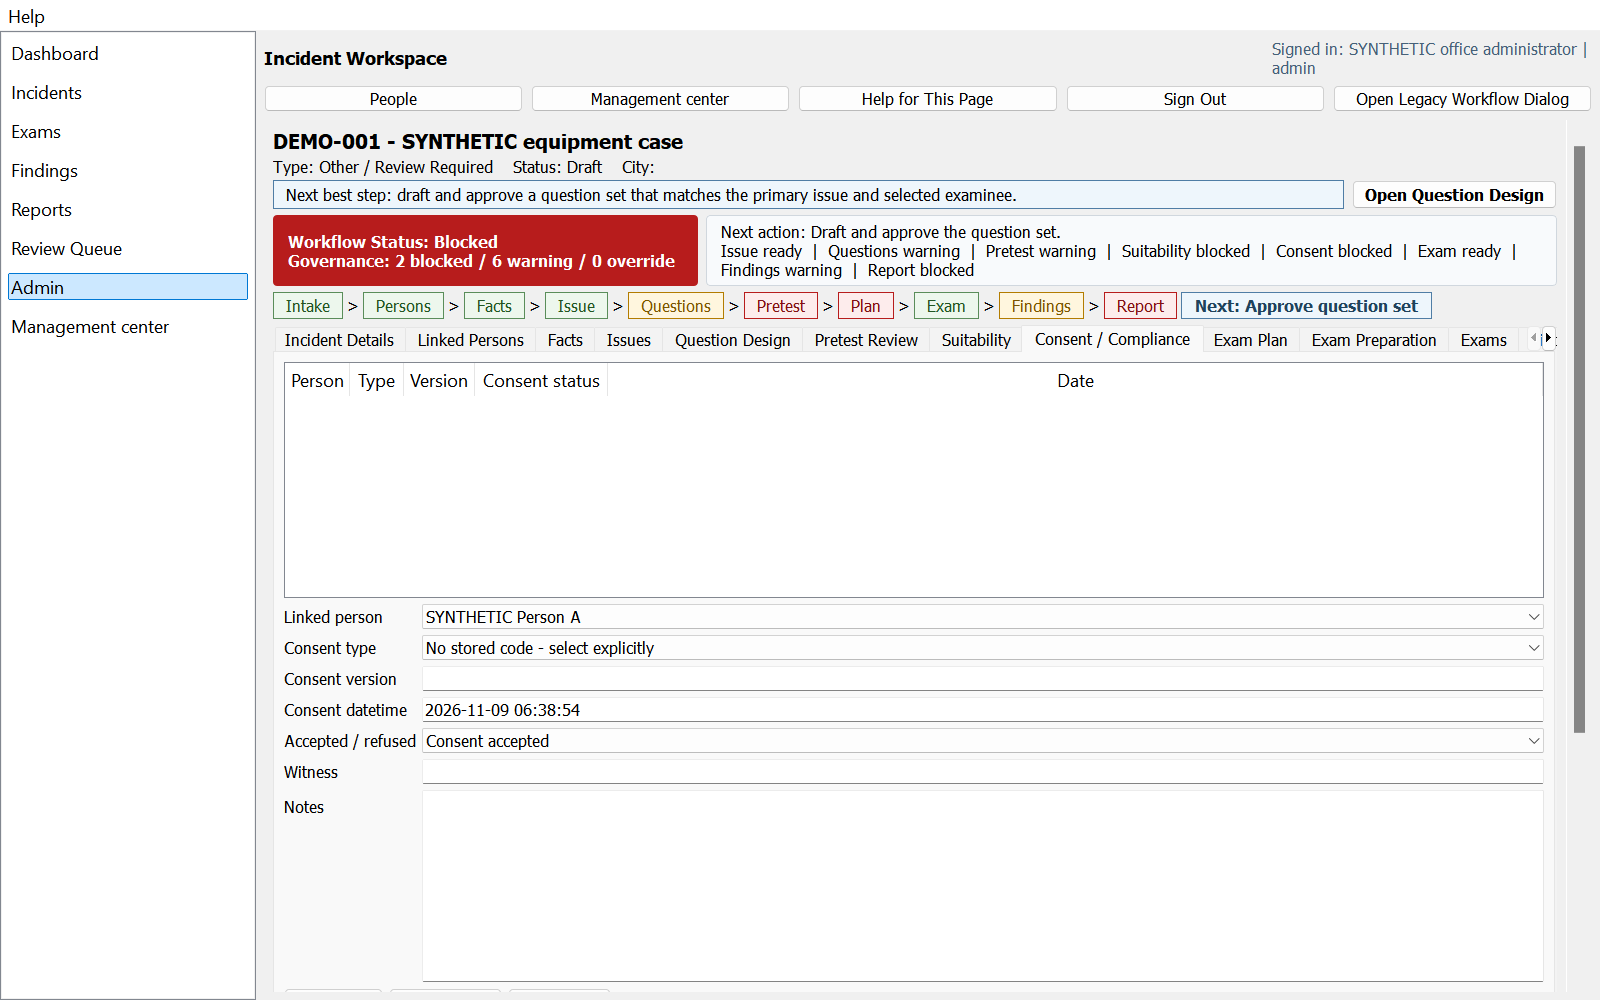
Illustrations use fictional demonstration data. Visible warnings are part of the example, not instructions to bypass prerequisites. Open a picture for its original resolution. Some on-screen explanations remain English; follow the translated operating instructions.
12. Guided automation and examiner confirmations
Exam Plan generates procedural steps with instructions and confirmation history. Read the current instruction, perform the real action, then confirm it. A Next best step button navigates to relevant work; it does not perform sensor placement, obtain consent, approve wording or start acquisition on your behalf.
The reasoning chain is readiness and governance → signal quality → response description → repeated-event comparison → issue context → limitations → human findings. Software heuristics are unvalidated. Strong-looking responses must not bypass poor-quality or uncertain timing evidence.
Warnings, blockers and permitted overrides are distinct states. Correct the underlying record where possible and reload guidance. Never confirm a step that was not performed. No always-on autonomous examiner, automatic cloud worker or automatic professional truth/deception verdict is established by this workflow.
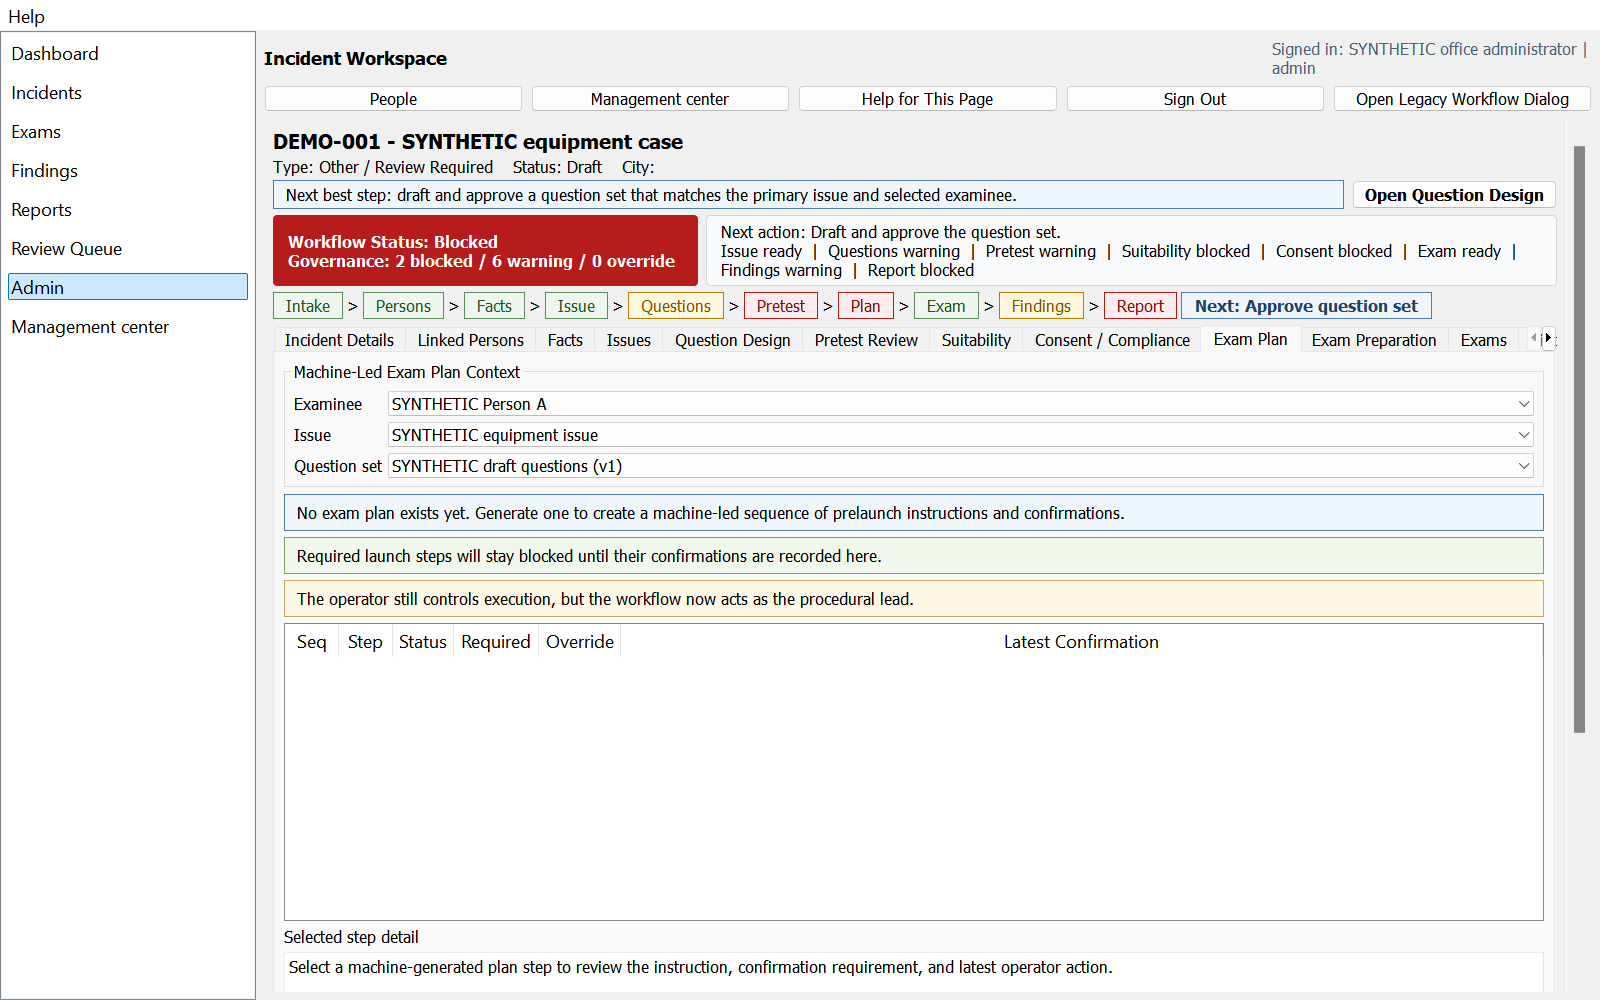
Illustrations use fictional demonstration data. Visible warnings are part of the example, not instructions to bypass prerequisites. Open a picture for its original resolution. Some on-screen explanations remain English; follow the translated operating instructions.
13. Examination records and frozen identity
Exam Preparation selects case, case participant, issue and question set, then creates/saves the examination record. A person can have repeat examinations, including different examiners. Verify identifiers rather than relying only on visible names or the most recently opened case.
For an eligible unstarted draft/prepared examination, use the separate identity snapshot panel. Preview the pinned person revision and eligible examiner account/profile; confirm explicitly. Admin may select an examiner; examiners select themselves. A stale preview is refused and must be reloaded.
After identity is confirmed, later profile edits do not rewrite the examination's saved attribution. Check before confirming. If a historical record has incomplete identity or authorship, retain that limitation rather than guessing. A typed examiner name is not a staff login, a reassignment or proof of qualification. Ask authorized support about a mistaken link.
14. Sensor connection, USB and binary-file input
Close competing acquisition applications before opening the device. Select the actual supported USB/COM source and verify incoming original frames and each physically attached channel. A visible port or constant zero is not proof of a connected sensor. Check the delivered hardware mapping rather than inferring it from a filename.
Hardware Lab and recorded binary input are development/bench paths. File bytes may come from an actual device, but playback does not prove live capture, calibration, original sample-clock accuracy or a completed real examination. Keep file provenance, original bytes and physical tests separate.
If the connection stops because no data arrived, note the selected port or file and the displayed message. Close your test connection and check the cable, device, source selection and competing applications. Do not fabricate samples or guess a different hardware type. A stated sample rate or byte count alone does not prove loss-free acquisition.
When file input is offered, close competing capture work, select the supplied binary recording and inspect the source shown on screen before starting playback. Keep the original file unchanged and label all resulting work as file playback. Verify that supported channels actually appear. Do not report playback as a new live examination or as evidence that the connected USB device was tested.
15. Preparation handoff, recording, stop and exit
If using the preparation workspace, complete its explicit transfer process before recording. Verify the destination person, final reviewed wording and any required backup confirmation. Opening a preparation page does not by itself prepare the recording screen. If transfer is unavailable or refused, keep the draft and resolve the displayed prerequisite rather than recreating approvals manually.
Before Start, inspect the selected person, session, source, question order and actual signals. During the session follow the approved sequence and record the real question/answer events. Ordinary Start and Start Prepared are different paths; do not assume prepared evidence is created for every legacy session.
Stop closes admission and initiates owned drain/finalization. Operator Stop is not proof of successful storage. Preserve incomplete/failed evidence, pending queues and error details. Do not start another session to reuse a failed recording ID or force exit while required saving remains pending.
16. Recording-screen controls and display
At rest, select the intended person and session and inspect the connected source before Start. Use the session timer control when present to set the intended duration. Starting a timer is not a substitute for checking recording status. Do not change identity or overwrite history simply to resume a failed session. Stop and wait for saving to finish before closing.
Graph appearance controls change the view, not the original measurements. Use channel visibility and line-width options where available to make the display readable. In camera-channel settings, inspect the immediate effect of each visibility checkbox; Save preserves the chosen configuration. Hidden graphs must not be treated as absent recorded channels. Check the actual recorded channel list separately.
During review, Replay changes to Pause while replay is running; Pause stops movement without creating a new recording. Use backward or forward movement where available and check the current position; an endpoint can hide its unavailable direction. Camera replay controls open available saved video, not a new live camera recording. A missing video must stay identified as missing.
17. Camera, monitor and optional room audio
Camera on/off controls the actual camera action for the current mode. Camera settings adjust its configuration; camera review opens available recorded video rather than starting new capture. A monitor window being visible is not proof a session video file was successfully finalized.
Prepared room audio is opt-in, requires explicit current-session authorization and device checks, and is not armed merely by opening Audio Setup. Review evidence and checked close/readback status independently of a working microphone icon. Treat missing/failed media as missing, not silently complete.
Audio listening, video replay and signal review remain separate evidence paths. Synchronized AV replay/export is not qualified in this baseline and is excluded from current scope. Do not promise 30 fps, speaker identification, speech timestamps, facial lie detection or complete room coverage without independent evidence.
For room audio, open Audio Setup while stopped, select the intended input and the permitted recording choice, and inspect device availability. Opening setup does not start recording. Room audio requires the prepared-session start and fresh authorization for that session; an ordinary start can refuse an enabled audio choice. Do not authorize another person or session by copying an earlier confirmation.
For a saved prepared session with available room audio, open its session-evidence view and choose Listen / Export Room Audio when offered. Let verification finish before listening or exporting. Choose a new destination for WAV export and reopen the result to check it. Audio is reviewed separately from video and graphs; combined synchronized video-with-audio export is not provided by this workflow.
18. Review Session, replay and exports
Open Review or History and select the exact saved session. Check the examinee, date, examination and available files before loading graphs. Missing, changed or inconsistent recording evidence can prevent opening. Do not use another session as a substitute. If an older recording lacks supporting information, state that limitation when reviewing or reporting it.
Use Replay/Pause and the available forward/backward controls to inspect recorded data; endpoint visibility depends on position. Treat graph package coordinates and operator markers as their recorded coordinate system, not verified speech/device timestamps. Never repair gaps by inventing physiological values.
PNG export offers channel/detail/resolution choices and creates a new chart-session folder with numbered images and events.csv. Inspect the result and cancellation/failure status. CSV exports and graphical overviews are different products; retain original sources. Do not assume a screenshot contains every sample or channel.
For chart images, choose Export to PNG in Review. Select channels, detail and resolution, then a destination parent folder. Available page spans include 30, 60 or 120 seconds and an overview. Inspect the newly created image set and its event list. Reduce detail if an export is too large; cancellation is not completion. Image export does not create a video or certify exact speech timing.
19. Machine analytics, reviewed analytics and provenance
Post-Exam Analytics: select the exact examination and run the applicable analysis. Inspect question events, quality, contamination, windows, repeat groups, issue/exam summaries and stated limitations. Poor or uncertain data is not a negative or positive truthfulness finding.
Reviewer corrections create a separate layer: event quality/timing review, window adjustments or exclusions, then Run Reviewed Recalculation. Compare machine and reviewed outputs and document reasons. Preserve the machine baseline. Reviewed output referring to another machine run must not be presented as a matched comparison.
Open analysis history to inspect the version actually used for the findings. Keep the original machine result and the reviewed result distinguishable. A summary without underlying signals cannot replace signal inspection. If supporting data is missing or the selected history cannot be verified, keep that limitation visible and do not silently use the newest result.
Operating steps
- Select the exact examination and recording. If no recording is available, keep the no-data state and investigate instead of running analysis on unrelated material.
- Run machine analytics only for supported available input, then inspect quality, timing provenance, question windows and limitations before interpretation.
- For review, select the exact event/repeat group, enter reasons for quality/window/exclusion changes and save them before Run Reviewed Recalculation.
- Reopen history and compare the corresponding original and reviewed results. Preserve any verification failure and ask authorized support rather than substituting another analysis.
20. Reading channels and question-response windows
BVP/PPG shows an optical pulse-related signal. GSR shows an electrodermal signal. Respiration belts show breathing-related changes at their placement sites. Temperature and BPHEG are distinct channels when the delivered hardware and saved recording actually contain them. A channel label alone does not establish physical units, calibration or sensor contact. Never infer a missing channel from a different one.
Inspect the period before the question, the question/answer region and subsequent recovery. Compare available channels and repeated questions while checking motion, contact loss and other contamination. Read timing-confidence labels and the actual axis before describing a response as occurring at an exact second. A large response or a flat trace is not by itself a truthfulness conclusion.
In visual review, select the exact event before adjusting a window or excluding a contaminated segment. Explain the reason, save the review and run reviewed recalculation. Inspect the difference from the original result. If timing, signal quality or source availability remains insufficient, retain an inconclusive or limited interpretation rather than filling gaps or claiming a precise physiological diagnosis.
21. Examiner findings and immutable history
In Findings select the actual examination, inspect its evidence and draft your own summary, basis and limitations. Separate observations from allegations and professional interpretation. An automatically generated description is not the examiner's signed opinion.
Saving a new finding revision preserves author attribution when available, frozen assigned-examiner references and the analysis context used. Finding history shows earlier versions read-only. Stale edits are refused; reload and reconcile rather than overwrite another saved revision.
Before finalizing, verify authorship, assigned examiner, reviewed material and unresolved limitations. Finalization is a document status; it is not independent professional endorsement. Arrange any required second-person review through your approved office procedure. Do not attribute an older unattributed finding to the person currently signed in.
22. Versioned reports, signal graphs, PDF and printing
Report → Preview Current renders the selected finding revision and its pinned analysis evidence, with other context labelled render-time. Inspect content before Save Report Snapshot or permitted Finalize Report. Each save creates a frozen version; selecting an old snapshot must not silently substitute current analysis.
Inspect the graphs separately from the written opinion. Archived graphs are overviews of available recorded channels, not a display of every sample. Read axis labels: an index is not elapsed seconds. Missing channels or uncertain question markers must remain identified. Do not interpret an overview as proof of sensor calibration, complete coverage or precise speech timing.
Use Export PDF or Print Preview with your authorized account. Choose the intended saved version and a safe destination. Open the exported file and check every page, graph, name, date and limitation before delivery. A failed or cancelled export is not a published report. Keep the saved source version and do not confuse a file export with professional approval.
Operating steps
- Open the intended examination's Findings, enter the human summary/basis/limitations and save a revision. Do not describe an absent recording as reviewed.
- Open Report and preview the exact finding revision and pinned analysis. Inspect missing/unattributed/summary-only notices and separately labelled render-time context.
- Save a snapshot only after checking it. Selecting an earlier snapshot must display its frozen content, not the latest draft; finalization remains distinct from independent professional approval.
- Export PDF or use print preview with current authorization. Reopen the resulting file and inspect text, graphs, labels and omissions. Preserve a failed export and original evidence; do not claim publication from a button click.
23. Worklists, central Reports and oversight
Dashboard, Exams, Findings, Reports and Review Queue present different worklists. Search and filters change visible rows, not permissions or clinical validity. Open the exact case/examination before acting; a backlog count is not proof of completed work.
In the central Reports list, select the intended saved version and inspect its preview before export or printing. If access expires or a view becomes unavailable, sign in again and reload it explicitly. Resolve permissions through the administrator. A report being listed does not mean it is final, independently reviewed or ready to send.
Review Queue and operational analytics surface blockers, warnings and material reviewed changes. Acknowledge Warning records acknowledgement; Request Rework records required follow-up. Neither action alone repairs data, validates a method or replaces an independent professional review.
24. Administration, rules and health
Admin contains users, declared professional profiles, vocabulary, issue/question templates, question rules, workflow policies, jurisdiction rules, reviewed-change escalation rules, operational analytics, manuals and health/backup status. Change only the intended setting and preserve its reason/version where supported.
Policy enforcement levels off, warn and block are different. Turning a policy off does not fix its underlying risk. Template edits affect their supported future use; they do not rewrite frozen questions or historical reports. A custom stored label remains source data rather than an automatically translated UI term.
Use System Health to inspect the displayed status, backup results and diagnostics relevant to a problem. A successful check does not confirm that every external attachment or recording is available. A synchronization status label does not establish an active synchronization service. Do not rely on synchronization for backup or transfer unless separately supplied and accepted.
25. Backup, isolated restoration and data protection
Before an approved upgrade, save or close ongoing work and choose Create Backup in System Health / Backup. Keep the backup in an authorized protected location and use Validate Backup. Note its date and scope. A backup of the application alone does not protect your records; check that separately stored recordings and attachments are covered too.
Stage Restore validates/copies into isolated staging rather than overwriting the live database. Inspect integrity, expected records, decryptability and separately referenced media using the original Windows account. Do not activate a staged copy just because its file exists. Keep the original and verified backup as rollback.
Some protected records depend on the original Windows account. Do not assume that copying files to another account will make them readable. Test recovery on a separate copy without replacing working data, and obtain authorized help before moving computers. Protect all backups and exports as confidential. Routine support messages should not contain real examinee information or passwords.
26. External AI assistance and safe data exchange
AI assistance is optional and separate from ordinary recording and case management. Do not assume that the software automatically connects to an AI service or sends information. If your office authorizes an external assistant, confirm its account, privacy arrangements and permitted use first. AI suggestions do not approve questions, qualify a method or determine truthfulness.
Preparation: remove unnecessary identifiers; provide only authorized case facts with their uncertainty; request draft structure, not invented facts. Review every proposed question against the actual issue, language/comprehension, method and applicable permissions. Enter approved wording through the normal question workflow and redo pretest review when wording changes.
After a session, deliberately select the correct CSV/source files and verify identity, units, coordinate meaning, missing channels and quality limits before any authorized transfer. Ask for descriptive observations and missing-data questions. Check AI output against original evidence; retain human authorship and limitations. Never upload names, biometrics or recordings merely because an assistant requests them.
27. End-to-end practice exercise
Use synthetic data only: create office staff, a fictitious person and case DEMO-001. Save/reopen the person, add/link a case participant, enter a sourced hypothetical fact and one focused issue. Create a question set, review exact wording, record comprehension/suitability/consent as synthetic exercise records and confirm only steps actually rehearsed.
Create an examination and inspect/freeze eligible identity where supported. Rehearse handoff without presenting file playback as a physical examination. If testing a real device under separate approval, verify original frames/channel evidence before Start, then inspect finalization rather than assuming Stop succeeded.
Review the exact session, run the applicable descriptive analytics, inspect quality and separate reviewed changes, save a human draft and versioned report, and inspect PDF/graphs. Create/stage/verify a backup on an isolated copy. Success of this exercise is software familiarization, not professional/hardware/customer acceptance.
28. Fault isolation without destroying evidence
No startup: check complete package, exact version and error; do not delete a database or bypass licensing. No data: check the selected source, other port owners, cable/device and actual incoming frames. Missing channel: check physical attachment/applicability, not a guessed replacement value. Preserve the original recording.
If saving is refused, check required fields, your account permissions, the selected person/case/examination and whether another edit made your draft outdated. Protect unsaved text before reloading and reconcile changes. Missing or damaged recording evidence remains a problem to investigate; do not replace it with another session or declare it repaired without checking.
PDF failure: keep the previous destination and inspect the error; no success message means no verified publication. Recovery failure: preserve original, backup, staging and diagnostic evidence without automatic live replacement. Send support version, opaque IDs and privacy-safe errors, never credentials, raw physiology or personal case narratives by default.
29. Limits, acceptance and complete-work checklist
This guide describes the available operating workflow, not authorization for a particular real-world examination. Check the version and functions delivered to you. A translated guide or a successful software demonstration does not establish hardware calibration, professional qualification or scientific validity. Follow the stated limits even when a screen appears ready.
Before a real approved deployment, independently verify installation/rollback, account permissions, chosen hardware/channel mapping, save/reopen, exact question events, recording/media closure, report content/export and a recoverable backup. Resolve applicable authorization and factual gaps; an operator checklist cannot replace those facts.
Before delivery of any report, check the selected person and examination, final wording, source availability, quality limitations, examiner opinion, saved report version and exported pages. Complete required human review and protect the destination. Do not claim unavailable synchronized media, automatic professional approval or an automatic truth/deception decision. Keep a verified recoverable copy.
30. Daily operating checklist
Before: sign in with your own account; verify language, company, person, case and assigned examiner; save the final questions; complete actual comprehension, suitability and consent work; read blockers; inspect sensors and any authorized media. Do not start while an essential prerequisite remains unresolved.
During: follow the current instruction, use the reviewed wording, record actual question/answer events and note interruptions or disturbances. Confirm only actions actually performed. If a signal or media source fails, preserve the error and follow your approved pause/stop procedure instead of presenting the session as uninterrupted.
After: Stop, wait for saving, reopen the exact session, inspect data quality and media separately, save analysis and reasoned human findings, preview the saved report, check exports and create/validate the required backup. Sign out when finished. Deliver only the reviewed authorized output, not unrelated cases or unverified claims.